


This Biniboo Quiet book Plane Puzzle activity page is great for matching, observation, and focus. It increases problem-solving skills.
If you just started planning your quiet book, I suggest you read the Essential Guide to quiet books, where you can read about the process of making a quiet book. You will understand the correlation between page preparations and busy book bindings.
If you want to use the no-sew method, I kindly suggest reading an article about gluing before you start, to find out if your glue is suitable for making no-sew quiet book activities. Also, do a test and make sure your hot glue doesn’t melt the felt.
If you will make a sewn quiet book, make sure you know how to sew felt in quiet books correctly.

QUIET BOOK PLANE PUZZLE PAGE
NO-SEW INSTRUCTIONS
STEP 1
If you haven’t already, first, create a felt page base. Download and print the FREE PDF Plane Puzzle Quiet Book Pattern for this activity and cut out all the shapes. You can find the pattern at the bottom of the page.
Put the paper pieces on a stiff felt, transcribe them, and then cut them out from felt. If you don’t want to waste hours searching for all the materials you need and transcribing and cutting the felt, check my DIY store where you can buy a pre-cut DIY kit for this activity page.

Check if you have everything you need to make this quiet book Plane Puzzle page.
STEP 2
Glue together orange and gray felt. Wait for the glue is completely dry.

STEP 3
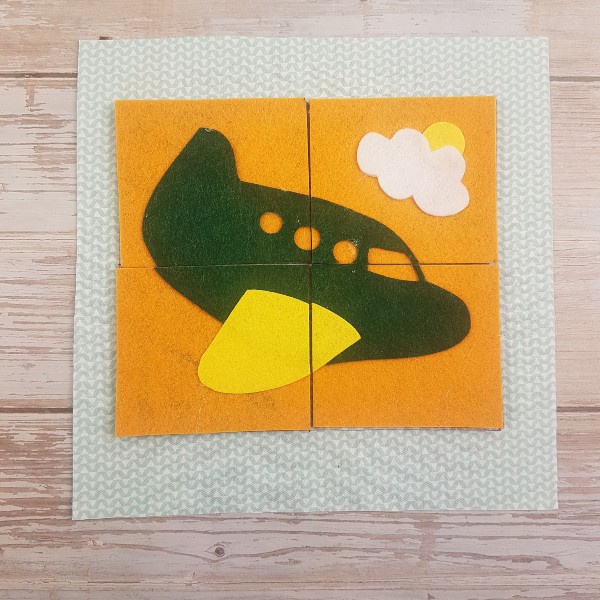
Put all the felt pieces on the orange felt to make a whole picture of the puzzle. Then glue the green plane and the yellow sun first. After, glue the yellow airplane wing and the white cloud also. Wait for the glue is completely dry.

STEP 4
Make marks with an erasable pen (the long edge at 8,25 cm [3 ¼ in] and the short edge at 7,25 cm [2 ⅞ in]) that you will divide into four pieces. Cut the rectangle on four pieces.


STEP 5
Glue hard velcro hooks in the center of every gray felt puzzle.

STEP 6
Put all 4 pieces as they should be on your prepared page base. With the help of the ruler, make lines around and in between the puzzle pieces with a permanent marker. Also, mark where you should glue the soft velcro loops. Glue the soft loops on your prepared page base.
You finished the Biniboo Quiet Book Plane Puzzle activity page. Congrats!


QUIET BOOK PLANE PUZZLE PAGE
SEWING INSTRUCTIONS
STEP 1
If you haven’t already, first, create a fabric page base or felt page base. Before you start sewing, make sure you’re familiar with how to sew stiff felt for quiet books.
Download and print the FREE PDF Plane Puzzle Quiet Book Pattern for this activity and cut out all the shapes. You can find the pattern at the bottom of the page.
Put the paper pieces on a stiff felt, transcribe them, and then cut them out from felt. If you don’t want to waste hours searching for all the materials you need and transcribing and cutting the felt, check my DIY store where you can buy a pre-cut DIY kit for this activity page.
Check if you have everything you need to make this quiet book Plane Puzzle page.
STEP 2
Make marks with an erasable pen (the long edge at 8,25 cm [3 ¼ in] and the short edge at 7,25 cm [2 ⅞ in]) on the orange felt piece that you will later divide into four pieces.

STEP 3
Put all the felt pieces on the orange felt to make a whole picture of the puzzle. Use marking tape to mark the first puzzle piece.


STEP 4
Sew on the shapes in this first puzzle piece. When you come to the marking tape, sew along the edge of the marking tape.


STEP 5
Take off half of the short marking tape. Put it back – but be sure that the edge of the tape is approx 3 mm (⅛ in) away from the stitch you made before on the first puzzle piece.


STEP 6
Sew on the shapes in this second puzzle piece. When you come to the marking tape, sew along the edge of the marking tape.


STEP 7
Take off the whole long marking tape and put it back – but be sure that the edge of the tape is approx 3 mm (⅛ in) away from the stitch you made before on the first and second puzzle pieces.

STEP 8
Sew on the shapes in the third puzzle piece. For nicer effect, first sew green felt with the green thread, and then yellow felt with the yellow thread. When you come to the marking tape, sew along the edge of the marking tape.


STEP 9
Take off another half of the short marking tape. Put it back – but be sure that the edge of the tape is approx 3mm away from the stitch you made before on the third puzzle piece.

STEP 10
Sew on the shapes in the third puzzle piece. When you come to the marking tape, sew along the edge of the marking tape. Remove the tape.

STEP 11
Put all the pieces on the gray felt. Make sure they don’t move with pins or clips. Now cut between the stitches you made (be careful you don’t cut the stitches.). You get four puzzle pieces and the gray felt piece divided into four parts.
P.S. If you forgot to sew sun with the cloud on the first puzzle as I did, now it’s time 😉


STEP 12
Sew the hard hook velcro circle on every gray rectangle. Don’t forget to mark which gray rectangle suits which puzzle piece because they are not the same size!
STEP 13
Clip or pin puzzle pieces on the gray felt again. Now you have to sew around every puzzle. Because color changes, the best way is to sew green color first, yellow color second, and orange at the end. Make sure that the plane and the velcro hook look outwards. Do this for all the other three puzzle pieces.


If you have a transparent thread, you can use it. In this case, just sew around. and sew around.
STEP 14
Put all 4 pieces as they should be on your prepared page base. With the help of the ruler, make lines around and between the puzzle pieces with an erasable marker. Sew on the lines you make with a triple stitch.

STEP 15
With the help of the puzzle pieces, mark on the prepared page the center of where soft loops should be. Sew the soft velcro loops on the marked dots.

You finished the Biniboo Quiet Book Plane Puzzle activity page! Congrats!


